Deploying Changes
Available to: Developers, Admins Minimum plan: Free
This guide walks through the step-by-step process of creating and executing a deployment in TitanRDM. A deployment applies your table definition changes to the physical database — creating new tables, altering columns, or removing deleted tables. For the conceptual overview, see Deployments.

Prerequisites
- At least one table definition on your current branch with undeployed changes (indicated by a "Needs Deploy" badge)
- Editor or Developer permission on the branch (or Account Administrator)
Step 1: Navigate to Deployments
- Click Development > Deployments in the sidebar
- You see a list of existing deployments for your current branch, filtered by default
The list shows each deployment's status, branch, creator, approver, created date, and deployed date. You can filter by branch, status, creator, or approver, and sort by any column.
Step 2: Create a New Deployment
- Click New Deployment
- TitanRDM displays all table definitions on your current branch that require deployment
The table list shows: - Table name — the table definition name - Domain — which domain the table belongs to - Checkbox — select which tables to include
You can filter by name or domain, and sort by name, domain, or selection status.
Selecting Tables
- Select all — include every table that needs deployment
- Select specific tables — check only the tables you want to deploy now
Tip: If you are making related changes across multiple tables (e.g., adding a foreign key that references a new table), include both tables in the same deployment. TitanRDM handles dependency ordering automatically.
- Click Create Deployment
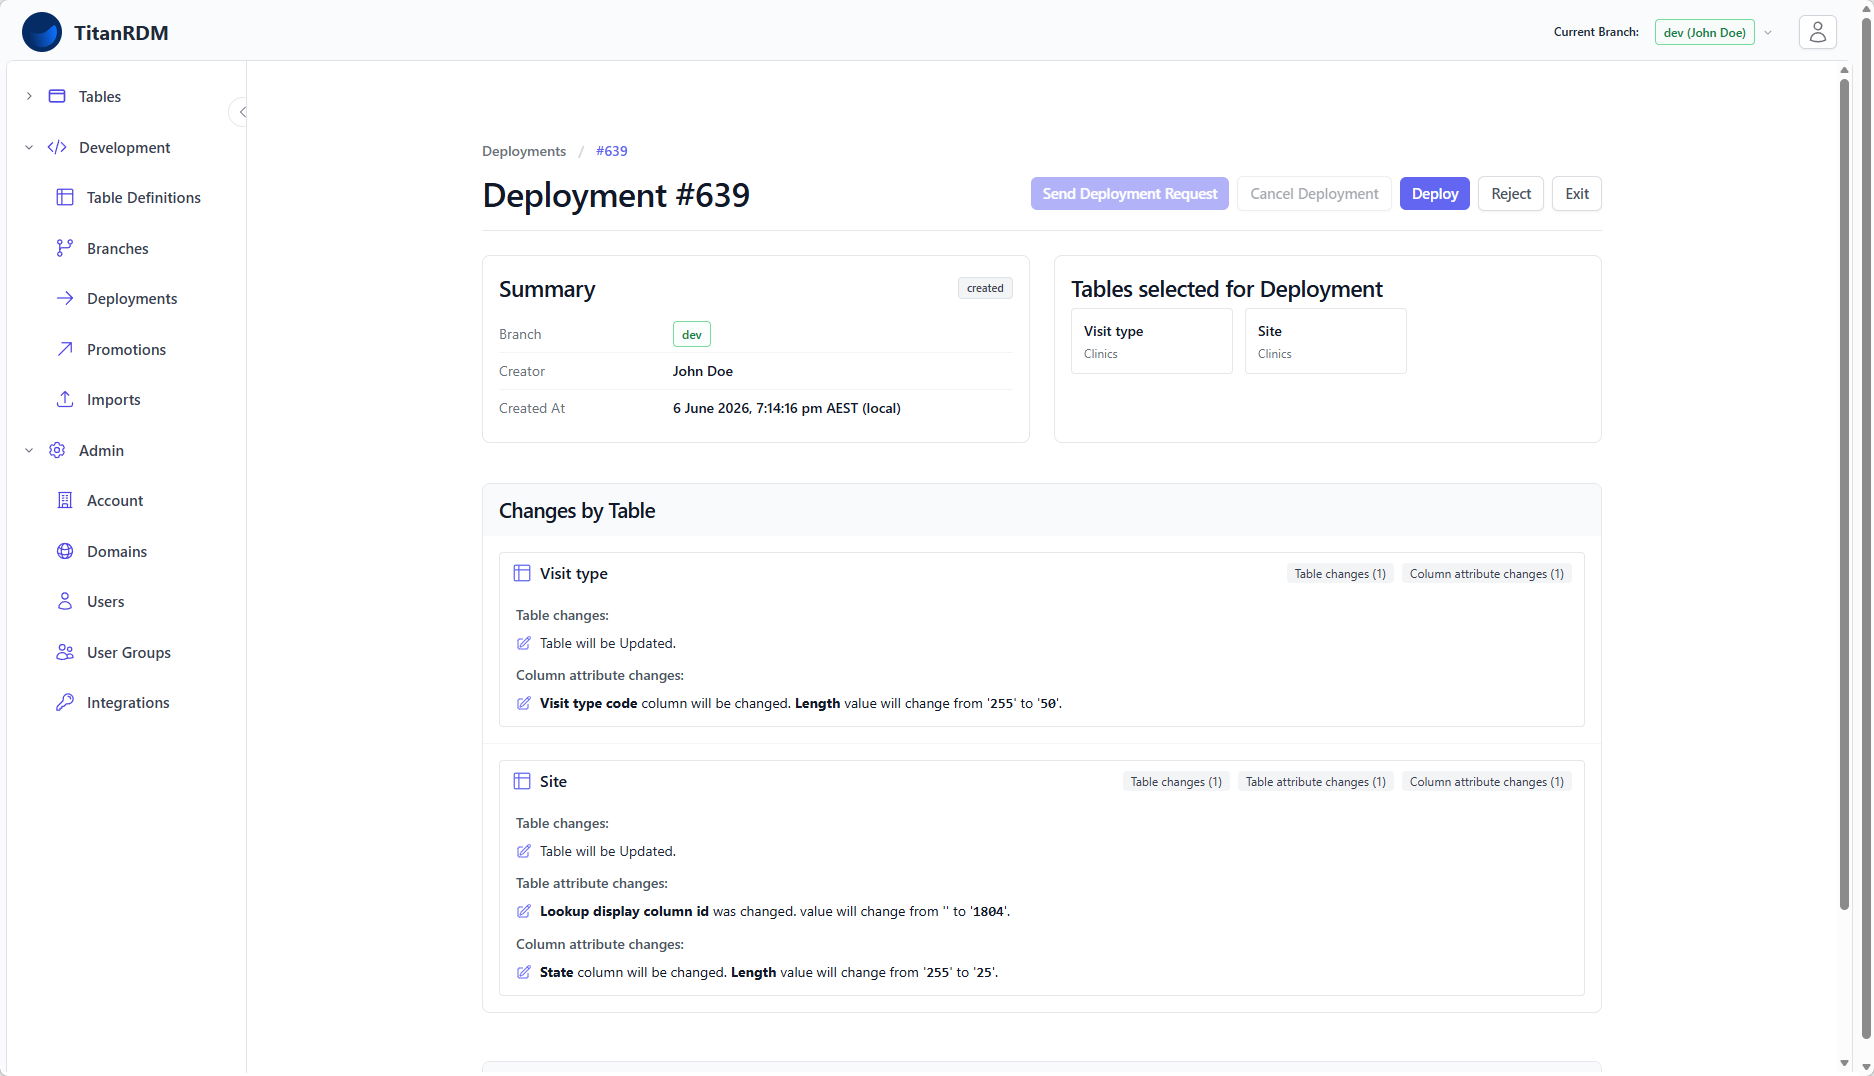
Step 3: Review the Diff
After creation, you are taken to the deployment detail page. The diff shows exactly what will change when you deploy:
Table-Level Changes
| Badge | Meaning |
| New | A new table will be created |
| Modified | An existing table will be altered |
| Deleted | A table will be removed (renamed with _t_rem suffix) |
Attribute-Level Changes
For each table, you see detailed changes:
- Table attribute changes — name, database table name, domain, description, load type, lookup display column
- Column changes — new columns being added, existing columns being modified, columns being removed
- Column attribute changes — for each modified column: name, data type, length, scale, primary key, required, foreign key, valid values, description
Each change displays the old value and new value side by side.
Step 4: Deploy
Once you have reviewed the changes and are satisfied:
- Click Deploy
- TitanRDM executes the SQL changes against the database
- On success, the deployment status changes to Deployed
- The table definitions are marked as no longer requiring deployment
What Happens During Deployment
For each table in the deployment:
| Table State | SQL Generated |
| New table | CREATE TABLE with all columns, system columns, and primary key constraint |
| Modified table | ALTER TABLE for each column change (ADD, ALTER, DROP, RENAME) |
| Deleted table | Physical table renamed with _t_rem suffix |
Tables are deployed in dependency order — if Table A references Table B via a foreign key, Table B is deployed first.
Step 5: Verify
After a successful deployment:
- Navigate to the Tables section in the sidebar
- Your new or modified tables should appear under their domain
- Open a table to verify the column structure in the data grid
Deployment Request Workflow (Business/Enterprise)
On Business and Enterprise plans, deployments support an optional request and approval workflow:
Requesting Approval
If you do not have approver permission on the branch:
- Create the deployment as normal
- Click Send Request instead of deploying directly
- Optionally add a comment explaining the changes
- Branch approvers receive an email notification with a link to the deployment
Approving or Rejecting
Approvers (users in the branch's Approver group) can:
- Deploy — approve and execute the deployment
- Reject — mark the deployment as rejected with an optional comment
- Cancel — mark the deployment as abandoned
When Approval Is Required
Deployment approvals are available on all plans. The branch's approval settings and your permissions determine whether a deployment requires a separate approver or whether the creator can deploy directly.
Handling Failures
If a deployment fails:
- The status changes to Failed
- The error message is displayed on the deployment detail page
- The diff is preserved so you can see what was attempted
Recovery Options
| Option | When to Use |
| Retry | Fix the underlying issue (e.g., correct a column definition) and click Retry. TitanRDM rebuilds the diff and re-executes. |
| Abandon | If the changes are no longer needed, click Abandon to discard the deployment. Approvers are notified. |
Common Failure Causes
| Error | Cause | Fix |
| Type cast error | Changing a column type when existing data is incompatible | Correct the data first, or change the column type to something compatible |
| Table already exists | Attempting to create a table that already exists (stale state) | Check for orphaned tables; contact support if needed |
| Foreign key reference error | A referenced table does not exist yet | Include the referenced table in the same deployment |
Deployment Actions (Audit Trail)
Every deployment maintains a complete audit trail:
| Action | Description |
| Created | Deployment prepared with selected table definitions |
| Request Sent | Approval request emailed to branch approvers (optional) |
| Deployed | SQL changes successfully executed |
| Failed | An error occurred during execution |
| Rejected | An approver rejected the deployment |
| Cancelled | The deployment was cancelled (treated as abandoned) |
| Abandoned | The deployment was discarded; approvers notified |
Each action records the user, timestamp, and optional comment.
Deployments List
The deployments index page at Development > Deployments shows all deployments:
- Filtered by your current branch by default
- Filter by branch, status, creator, or approver
- Sort by branch, status, created date, or deployed date
- Paginated (12 per page)
Click any deployment to view its detail page with the full diff and action history.
Tips
- Batch related changes — include tables with interdependent changes in the same deployment
- Deploy frequently — smaller, focused deployments are easier to review and debug than large batches
- Review carefully — once deployed, structural changes are applied immediately; there is no automatic rollback
- Use feature branches — deploy on a feature branch first to test changes before promoting
Related Pages
- Deployments (Concept) — lifecycle and architecture overview
- Promoting Changes — moving deployed definitions to another branch
- Working with Branches — branch management
- Table Definitions — what gets deployed
- Creating Tables — the workflow that leads to deployment